#电子消费品光学
这家公司提供了一种用相机测量应变的方法,通过向被测目标喷涂一层pattern来实现
[Stress Engineering Service公司](https://www.stress.com/dic-to-measure-large-areas-of-strain-displacement/)

"During component testing, strain and displacement data are often critical for fully documenting the behavior of the component. Strain is typically measured using bonded strain gages while displacement is measured with a string potentiometer or a linear variable differential transformer (LVDT). While these devices are often useful, they have limited capability in certain situations and testing scenarios.
A single-element strain gage will only provide the strain in the grid direction. Any displacement not in the measurement direction will not be directly obtained and, in many cases, adversely affect the actual measurement. Multiple strain gages or a gage rosette are needed to extract principal strains and directions. Strain gages must be bonded to a clean surface, which often requires removing material in the gage area. Further, the measurement area of interest must be determined prior to testing so that the strain gage can be installed in the required location. Measurement areas of interest are typically determined from analytical models which are often not 100% accurate, which then leads to issues in placing the strain gages. Depending on the local strain gradient, even slightly misplacing a strain gage can lead to dramatic differences between the actual strain and measured strain.
Digital Image Correlation (DIC) can be used to avoid these types of issues by measuring the surface displacement and strain over the entire area of interest. DIC utilizes optical photogrammetry techniques to obtain three-dimensional (3D) displacement measurements in six degrees of freedom (DOF) as well as surface strain measurements. DIC combines the functionality of a strain gage and displacement device into a single noncontact measurement system. A single DIC measurement will capture the entire surface strain field within the field of view (FOV), as well as any surface displacement in 3D. Multiple sequential DIC measurements will capture the surface acceleration and velocity of an object in 3D.
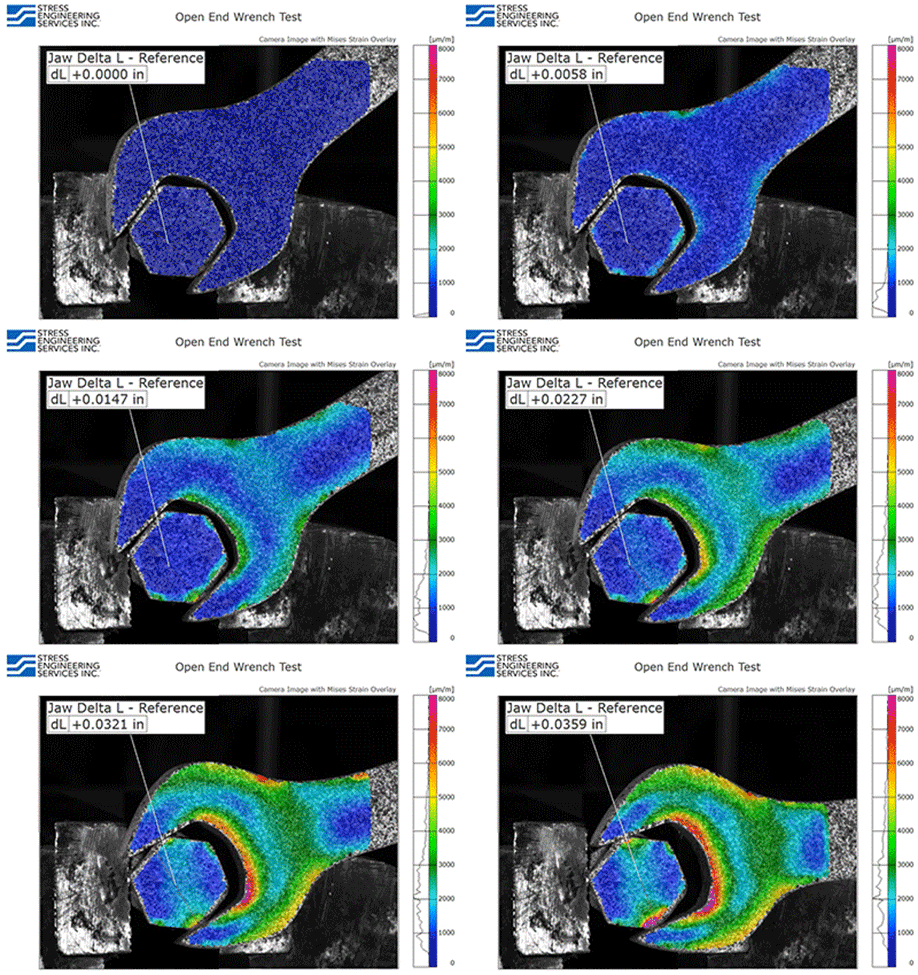
To implement DIC, a stochastic (random) pattern is applied to the surface of the test article, which is used as a reference surface for the measurement. A pair of specialized cameras are used to film the test article as it deforms under testing loads. The two cameras capture images of the test article before, during, and after the testing process. Advanced software tracks the unique surface patterns and develops a 3D mesh of the surface by using stereo-triangulation. The 3D, six DOF displacement and surface strains are then computed by comparing the newly generated surface mesh to the initial surface mesh. Figure 1 shows an example of DIC data obtained during a bolt torquing process. The surface strains are shown along with the displacement of the two contact surfaces of the wrench."